Palette Knife Painted Mountain Cake Tutorial with Lady in the Wild West

Learn how Lady in the Wild West creates this breathtaking landscape cake design using a palette knife and her must have Colour Mill colours. Even as a novice cake decorator, this style is fun, approachable and easier to accomplish than you think!
    Decorating Tips & Tricks
    Lady in the Wild West x Colour Mill Mountain Landscape Cake Design

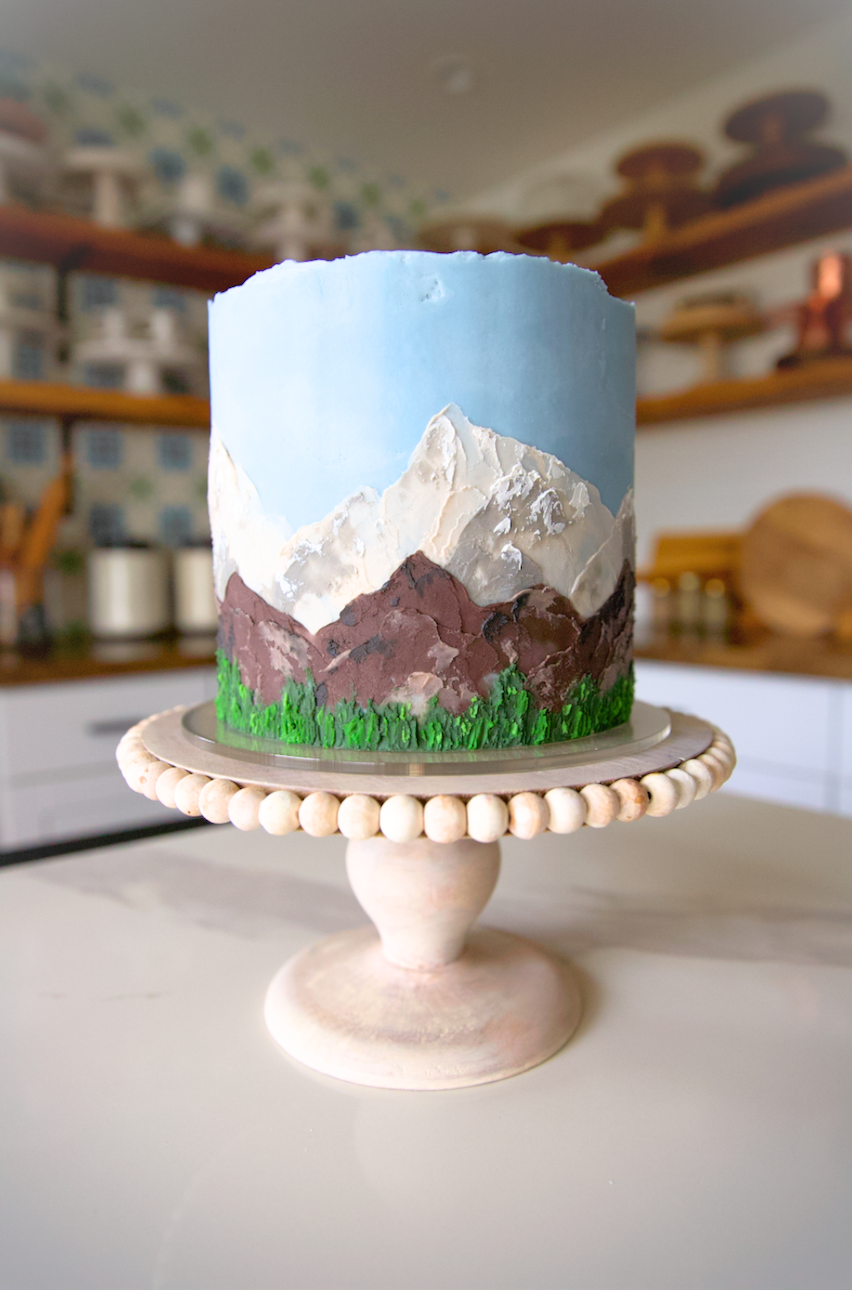
    The adventure begins! Let’s get out of our heads and into the mountains, where lines are uneven, texture is a love language and beauty is in the imperfections.

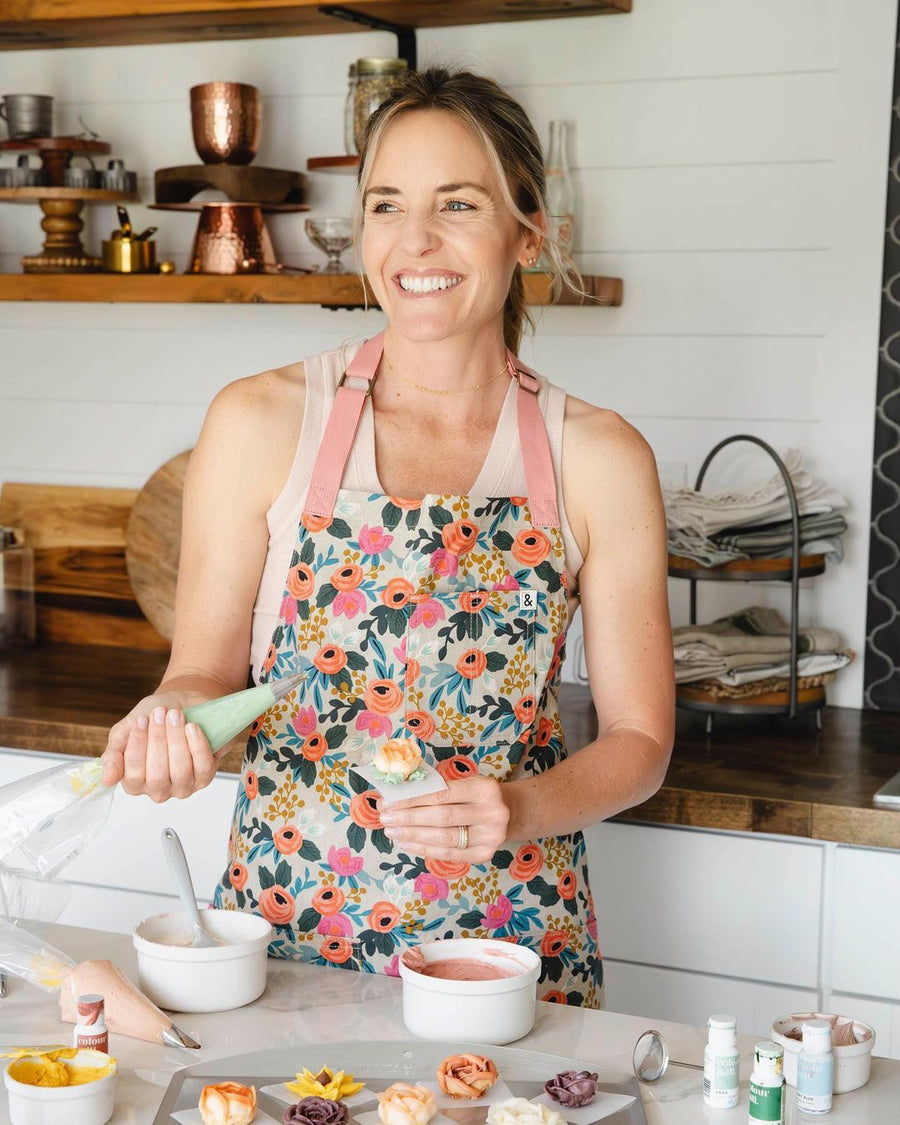
    We've partnered with Lady in the Wild West to bring you a palette knife painted mountain cake tutorial. Mountains and Mother Nature inspires Lindsey's work and her most requested cake design is the mountain landscape. We're sharing the tools, set up, Lindsey's helpful tips for success, along with a fun palette knife painting video. Let the adventure begin!

    Lindsey Johnson, the face behind Lady in the Wild West.
    Lady in the Wild West x Colour Mill Mountain Landscape cake
    Palette Knife Painted Landscape Cake by Lady in the Wild West

    Tools you will need:

    • Revolving Cake Stand
    • Colour Mill Cake Scraper to smooth the buttercream exterior.
    • Offset Spatula to apply the buttercream base.
    • One batch of American buttercream or preferred buttercream. Make enough buttercream to cover the cake with extra to mix the colour palette. The amount depends on the size of your cake. The cake featured is a four-layered 7” round cake. It used roughly 2 cups of buttercream to coat the exterior and 1 cup to make the color palette. 
    • Metal Palette Knives - one with an angled edge and one with a square edge. 
    • Flat Metal Baking Tray to mix the colour palette.
    • Paper Towels to clean the palette knives.
    • Refrigerator to chill the cake between paintings. 
    • Colour Mill Oil Blend: Denim, Mango, White, Taupe, Concrete, Coffee, Pebble, Black, Olive, Forest, and Green

    Step 1: Mix the Colour Palette

    Begin by mixing the Denim blue base colour for the cake exterior. In a medium bowl, add 3-4 drops of Denim to roughly 2 cups of buttercream. This will create a soft blue backdrop. If desired, tone down the Denim with a tiny drop of Mango. Set aside.

    On a flat metal baking sheet, mix the mountain landscape colour palette. Work with 1-2 tablespoons of buttercream for each colour. Mix 2 drops of White with 1 drop of Taupe. For the remaining colours, add 2-3 drops of each: Concrete, Coffee, Pebble, Black, Olive, Forest, Green, and White. If a deeper colour is desired add 1-2 drops more. Set aside.

    Step 2: Sky

    Using an offset spatula, add the Denim base buttercream to the crumb coated, chilled cake. Start at the top and smooth over the side in an even layer to fully coat the cake. Use the cake scraper to smooth the sides. Rather than smoothing the top edge, keep the top edge uneven to add to the rustic element of the design. Chill the cake for 15-20 minutes until the buttercream is firm.

    Colour Mill x Lady in the Wild West Mountain Landscape cake design
    Colour Mixing to Create the Perfect Landscape Shades
    Colour Mill x Lady in the Wild West Mountain Landscape cake design
    Creating the Sky using Colour Mill Oil Blend 'Denim'

    Step 3: Snowy Mountains

    Starting about 2/3 up the cake, begin building the snowy mountain layer. Scrape a generous amount of the White and Taupe mixed buttercream onto the bottom of the angled palette knife. Using the edge of the knife as a natural guide for the mountains, begin to apply the buttercream to create the mountain landscape. Drag and pull the knife in opposite directions to create different mountain heights, adding edges and texture here and there. Paint the mountains about 2/3 down the cake. Wipe the palette knife clean. Chill the cake for 10 minutes.

    Scrape a thin layer of Concrete buttercream onto the bottom of the palette knife. Using small swipes, add highlights, dimension, and texture to the mountains, focusing on the peaks and edges. Wipe the palette knife clean. Chill the cake for 10 minutes. 

    Step 4: Rocky Mountains

    Starting at the base of the snowy mountains, begin building the rocky mountain layer. Scrape a generous amount of Coffee buttercream onto the bottom of the angled palette knife. Using the angled edge of the knife as a natural guide for the mountains, begin to apply the buttercream to create the mountain landscape. Drag and pull the knife in directions to create different mountain heights, adding edges and texture here and there. Paint the mountains down the cake, leaving roughly 1” at the bottom. Wipe the palette knife clean. Chill the cake for 10 minutes.

    Scrape a thin layer of Pebble buttercream onto the bottom of the palette knife. Using small swipes, add highlights, dimension, and texture to the painted mountains, focusing on the peaks and edges. Wipe the palette knife clean. Chill the cake for 10 minutes. Scrape a thin layer of Black buttercream onto the bottom of the palette knife. Repeat the highlights, texture, and dimension. Wipe the palette knife clean. Chill the cake for 10 minutes.

    Step 5: Trees

    Starting at the bottom of the cake and working upward to the rocky mountains, begin building the tree layer. Scrape a generous amount of Olive buttercream onto the bottom of the square edge palette knife, focusing on the tip of the knife. Holding the knife vertical, with the square edge facing down, gently swipe the buttercream upward till it meets the bottom of the rocky mountain layer. Use the edge corners of the knife to pull the buttercream upward so it’s textured and uneven, to resemble the look of tree tops.

    Continue around the base of the cake. Scrape a small amount of Forest buttercream onto the bottom of the angled palette knife, focusing on the tip of the knife. Holding the knife vertical, swipe the buttercream from the bottom upward, here and there. Repeat these steps with Green buttercream. Chill for 10 minutes. 

    Step 6: Snowy Highlights

    Scrape a small amount of White onto the bottom of the angled palette knife. Using small swipes, add highlights, dimension, and texture to the painted mountains, and trees if desired, focusing on the peaks and edges. Chill the cake for 10 minutes or until ready to serve.

    Lady in the Wild West x Colour Mill Mountain Landscape cake
    Lady in the Wild West x Colour Mill Mountain Landscape Cake Design
    Lady in the Wild West x Colour Mill Mountain Landscape cake design
    Lady in the Wild West x Colour Mill Mountain Landscape Cake Design

    We hope you enjoyed learning this process. Remember, Mother Nature isn’t perfect with her designs. She doesn’t stress and neither should you. Palette knife painting is about being wild and free, just like the great outdoors. Shop all the Colour Mill Colours and tools Lindsey used to create this masterpiece below!

    Oil Blend

    White

    calculated at checkout

    A must-have in every caker & baker’s tool kit. Use it to create your very own custom Colour Mill shades, to neutralise the yellow tones in your buttercream and chocolate or on its own for crisp & clean caking.

    Written By Colour Mill
    Share